

Why Hasura?
In the last post series, I talked about ways to create a performant static website that can be edited easily via Strapi (a headless CMS).
For a lot of sites on the web, this is completely enough, but there are also services and websites or event phone Apps out there that need more than just static content but content that is created by its users or connects users. The most known platforms in that matter are Social Media platforms.
In the case of Social media, it is still possible to use tools like Strapi to create a website but it comes with disadvantages too. Its streamlined and easy way to create Content-Types can on the one hand make it way easier to create tables needed for an app but it also makes it harder to be more specific about the database types to choose from. In addition to that its graphQL implementation doesn't support subscriptions which makes it hard to create more dynamic real-time apps like a Social Media platform.
This is where Hasura comes into play.
What is Hasura
Hasura is a tool that can one or many SQL or GraphQL databases and automatically create a GraphQL scheme for it. In addition to this, it enables easy role and condition-based rights management that allows the integration of a lot of different authentification services to enable the login. In theory, this even enables the integration of an SQL Database used created by Strapi and uses Strapi's advantages while still handling role management on the front-end with Hasura.
In Short
Hasura transforms any SQL database into a real-time database with GraphQL and Role management capabilities.
One of the bigger things that Hasura is missing however is an Auth service. There are plenty of tutorials online to use Firebase Auth or Auth0 or any other existing Auth service to enable authentication. This however has the disadvantage that you are dependent on those services being around and keeping their costs low. In my experience, this is a dangerous bet to make. It is usually really hard to leave a service like Auth0 or Firebase and migrate your users to another system. And not only complicated but also often very inconvenient for the users.
This is exactly why this project came to be.
I was experimenting with ways to use Hasura with an auth service that does not cost anything extra while still being secure.
Once I found I came to the following question:
Why not make this project portable and easy to use for anyone that needs it? (Or maybe I'll need it in future projects)
The Project
If you are experienced with Hasura, node (express), and Docker and decide that you won't need any info on how it is built you can just fork the GitHub project and use it however you want.
If you are still interested then I'm happy to go into detail.
Getting Started with Hasura
Hasura offer its own already set up docker-compose file which we just need to run and set up. We will modify this to also add an node (express) server to run the custom login verification code in a docker alongside it. This way we can easily start both instances with one command.
How to use the dockerfile is explained in detail here.
I'll summarize the necessary commands:
# create a new project
mkdir hasuraLogin
cd hasuraLogin
wget https://hasura.io/docs/latest/graphql/core/getting-started/docker-simple.html#docker-simple
sudo docker-compose up -d
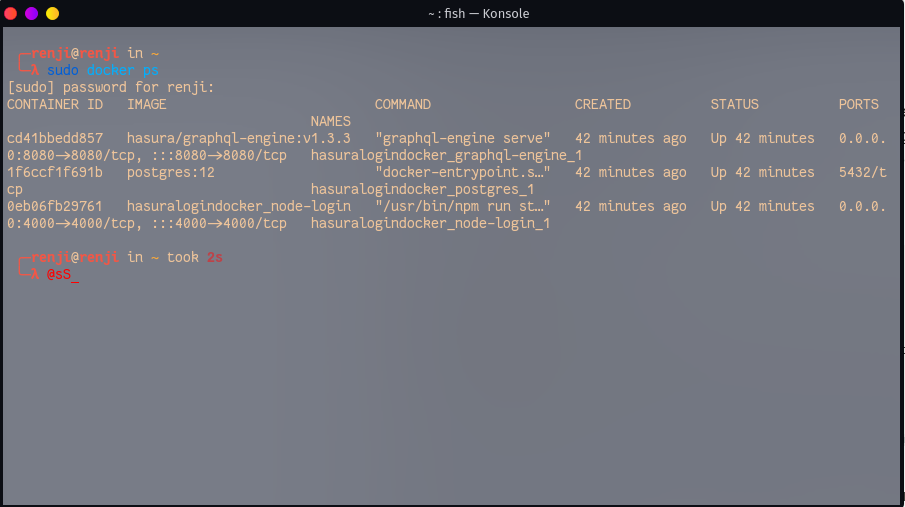
sudo docker ps
After the last command, there should be two active dockers listed in the terminal. hasura/garphql-engin and postgress. The first one is the Hasura engine that we are going to work with. The latter one is a postgress database that is used by Hasura to hold all the Hasura metadata and login data.

In this screenshot, you also see a container called hasuralogindocker_node-login container. This is the one we will be creating to add login capabilities to Hasura.
Once this is running we can access the Hasura admin pannel via http://localhost:8080/console.
For you, the queries should start empty which is the first thing we will have to change.
We will need to
- Create A User Table in the database to save and check our user
- Create a SignUp action that creates a new user in the database
- Create a SignIn action that checks the username and password in the database and if a matching pair is found sends back user info and a JWT token for authentification
- Set up permissions so the actions can be called from outside
Doing those settings every time you set up a new instance of Hasura is tedious and prone to error. This is not necessary however since Hasura offers a CLI that allows to save the metadata and postgress migration files in a git and apply them whenever necessary. We will further go into those commands once we put everything together.
Creating a User Table
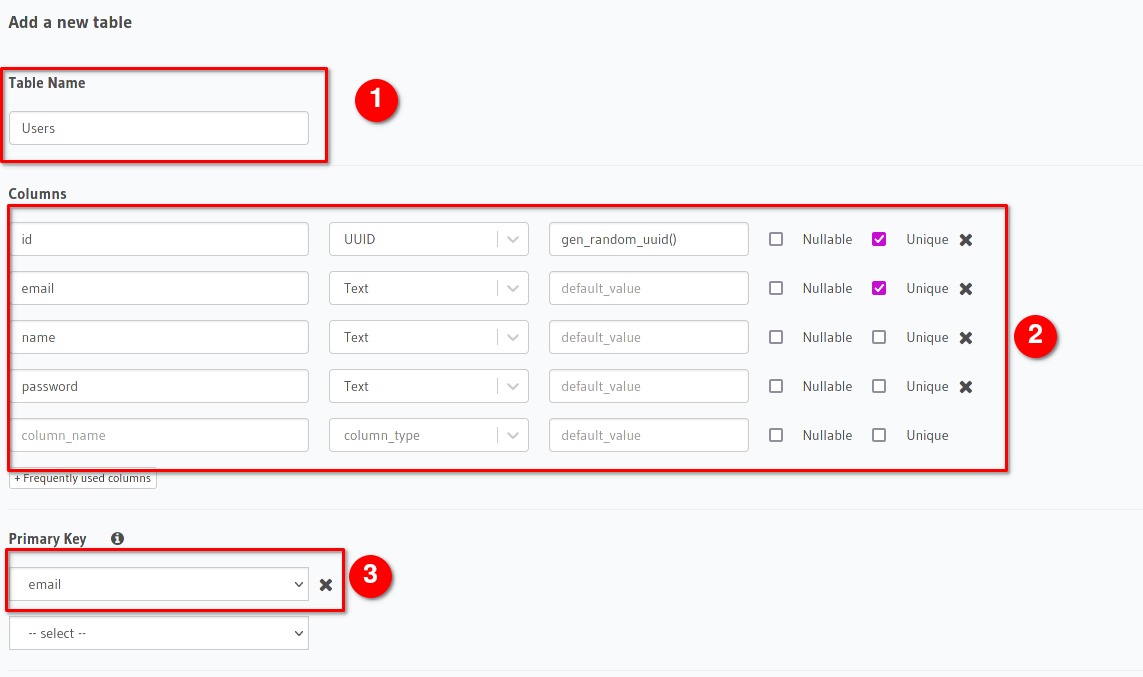
To do this we need to navigate to Data → Create Table
- Fill in the Users as the title
- Create the necessary fields. It is especially important here to create a unique email and id field. The id will be generated automatically by setting genrandomuuid() as the default value. This is a build-in function of Hasura. The password needs to be a text since we are later generating a seeded and hashed value of the password here to add additional security for our users in case someone gets access to the database.
- We set the email as the primary key to make it easiest to search by email
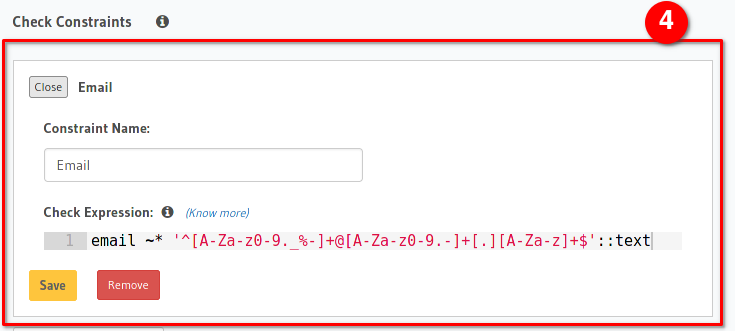
- We add a regex constraint to ensure the email value to have the shape of an email.
email ~* '^[A-Za-z0-9._%-]+@[A-Za-z0-9.-]+[.][A-Za-z]+$'::text
After that, we click on Add Table
Creating a Signup and SignIn Action
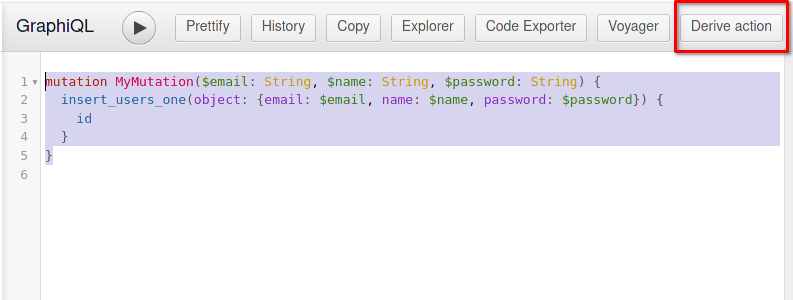
Hasura helps you to create actions easily. First, we need to go to Graphql and enter the mutation into the query field:
mutation SignUp($email: String, $name: String, $password: String) {
  insert_users_one(object: {email: $email, name: $name, password: $password}) {
    id
  }
}
Afterward, we can click on Derive Action to let Hasura immediately give us some dummy code to base our action on
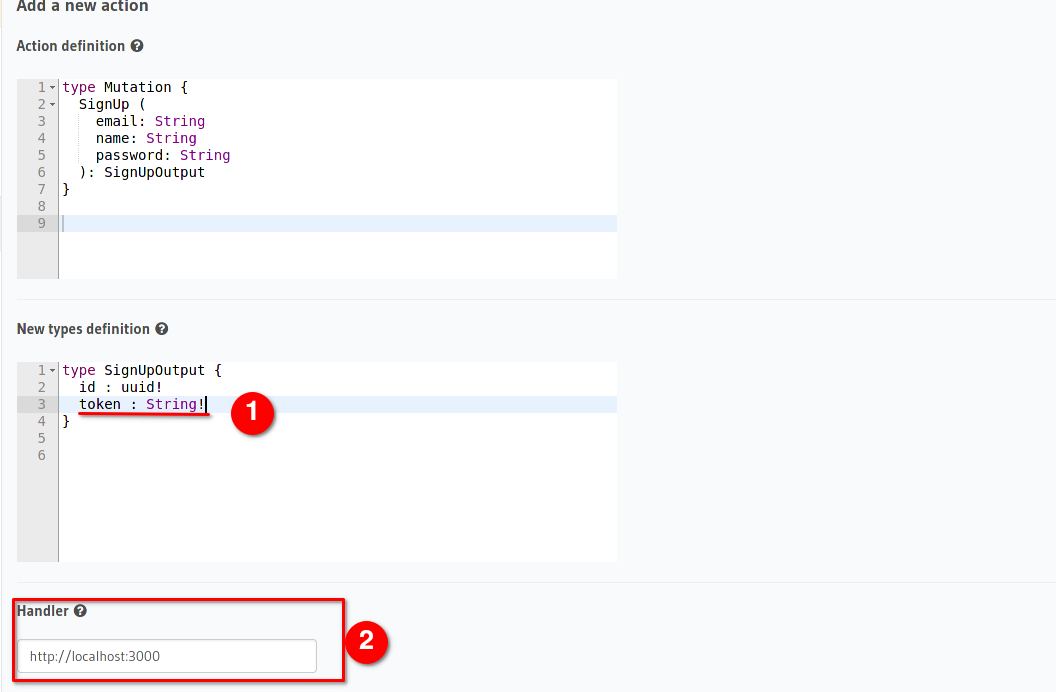
On this page, we will need to make two changes.
- Add an additional output field that will be used to allow the user to immediately log in after creating an account successfully
- Change the IP address of the handler from localhost to the local IP address of your computer. How to find the IP addresses you can look here.

We currently use the local IP address because docker's localhost address does not lead to the computer that runs docker. This has to be changed later when we create a docker container for the node (express) server as well.
But for development reasons we currently choose the local IP address.
In addition to changing the IP, we need to make sure the URL calls the right request SignUp instead of just accessing localhost:3000
The Handler should look something like this: http:192.168.0.123:3000/SignUp.
After this, we can click on Save to create the action.
In the same way as before we can now create a SignIn Action. With the exception that this time it is going to be a query instead of a mutation.
query SignIn($email: String!) {
  users_by_pk(email: $email) {
    id
  }
}
Since the query does not allow a password field we will have to add this in the action definition by hand.
Again we need change the handler to http:192.168.0.123:3000/SignIn and ****hit *Save.*
Writing the login code
Now that we have created two actions on the side of Hasura we need to write a rest API that does the signup logic, hashes the password, and sends back a signed JWT token to log the user in.
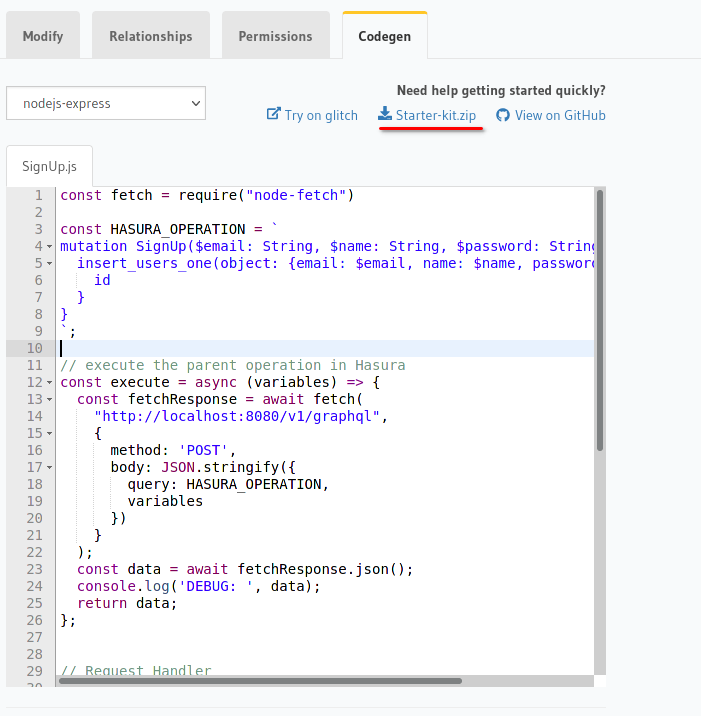
For this, we navigate to Actions → SignUp → Codgen.
Here Hasura helps us by offering an initial boilerplate code for the express app as well as already preparing the Graphql mutation that the API needs to make to the server.
First, download the starter-kit.zip from the server and unzip it into a folder.
In there we need to open a terminal and run.
npm install
npm install bcryptjs jsonwebtoken
npm run start
In addition to starting the node server, we added two extra libraries jsonwebtoken and bcryptjs. The first one will be used to generate a JWT while the latter is used to hash the password safely before saving it in the database.
Afterwards we can open a code editor and look at the code:
//src/server.js
const express = require("express");
const bodyParser = require("body-parser");

const app = express();

const PORT = process.env.PORT || 3000;

app.use(bodyParser.json());

app.post('/hello', async (req, res) => {
  return res.json({
    hello: "world"
  });
});

app.listen(PORT);
This is a simple express app that in its current state allows a user to make a request to https://localhost:3000/hello and get a JSON object back.
{ hello: "world" }
For simplicity, I will keep all the code in one file for now. It is similar to the project I posted in Github except that the two actions are moved into separate files there.
Signup
For the SignUp we take the code from the codegen on the Hasura admin panel and apply it to the sever.js code.
const express = require("express");
const bodyParser = require("body-parser");
const fetch = require("node-fetch")
const bcrypt = require("bcryptjs");
const jwt = require("jsonwebtoken");

const app = express();

const PORT = process.env.PORT || 3000;

app.use(bodyParser.json());

app.post('/hello', async (req, res) => {
  return res.json({
    hello: "world"
  });
});

// execute the parent operation in Hasura
const signup = async (variables) => {
  const HASURA_OPERATION = `
  mutation SignUp($email: String, $name: String, $password: String) {
    insert_users_one(object: {email: $email, name: $name, password: $password}) {
      id
    }
  }
  `;

  const fetchResponse = await fetch(
    "http://localhost:8080/v1/graphql",
    {
      method: 'POST',
      body: JSON.stringify({
        query: HASURA_OPERATION,
        variables
      })
    }
  );
  const data = await fetchResponse.json();
  console.log('DEBUG: ', data);
  return data;
};


// Request Handler
app.post('/SignUp', async (req, res) => {

  // get request input
  const { email, name, password } = req.body.input;

  // run some business logic

  // execute the Hasura operation
  const { data, errors } = await signup({ email, name, password });

  // if Hasura operation errors, then throw error
  if (errors) {
    return res.status(400).json(errors[0])
  }

  // success
  return res.json({
    ...data.insert_users_one
  })

});

app.listen(PORT);
This code is similar to the Hasura generated code with 3 exceptions.
- We Renamed the execute function to signup since we are going to add a SignIn function later as well
- We added two additional imports bcrypt and jwt
- We moved the HASURA_OPERATION into the signUp function (this is not the most efficient but for now it works)
This code now does the same thing as the Graphql signup mutation we created earlier. We need to modify the password to not be standing in cleartext but as a hashed value, as well as generate a JWT token so the user can SignIn after registration.
We will modify the Signup function to something like this:
// Request Handler
app.post('/SignUp', async (req, res) => {

  // get request input
  const { email, name, password } = req.body.input;

  // run some business logic

  // execute the Hasura operation
  let hashedPassword =  await bcrypt.hash(password, 10)
  const { data, errors } = await signup({ email, name, hashedPassword });

  // if Hasura operation errors, then throw error
  if (errors) {
    return res.status(400).json(errors[0])
  }

  const tokenContents = {
    sub: data.insert_users_one.id.toString(),
    name: name,
    iat: Date.now() / 1000,
    iss: "http://localhost/",
    "https://hasura.io/jwt/claims": {
      "x-hasura-allowed-roles": ["user"],
      "x-hasura-user-id": data.insert_users_one.id.toString(),
      "x-hasura-default-role": "user",
      "x-hasura-role": "user"
    },
    exp: Math.floor(Date.now() / 1000) + (24 * 60 * 60),
  }
  const token = jwt.sign(tokenContents, "JWT_SECRET")

  // success
  return res.json({
    id: data.insert_users_one.id,
    token
  })

});
Afterward, we can save this and test our signUp Mutation in Hasura.
To test ist we open Graphql in the admin panel and enter
mutation SignUp($email: String, $name: String, $password: String) {
  signup(email: "test@email.com", name: "testName", password: "testPassword")
}
Afterward, this should respond with a randomly generated user id and a JWT token.
SignIn
For the sign, we similarly copy the code from Hasura via Codegen and modify it to test the login data and create a JWT
const signIn = async (variables) => {
  const HASURA_OPERATION = `
  query ($email:String!)
  {
    users_by_pk(email: $email) {
      email
      id
      name
      password
    }
  }
  `;

  const fetchResponse = await fetch(
    "http://localhost:8080/v1/graphql",
    {
      method: 'POST',
      body: JSON.stringify({
        query: HASURA_OPERATION,
        variables
      })
    }
  );
  const data = await fetchResponse.json();
  return data;
};

app.post('/SignIn', async (req, res) => {

  // get request input
  const { email, password } = req.body.input;
  let lcEmail = email.toLowerCase();

  // execute the Hasura operation
  const { data, errors } = await signIn({ email: lcEmail });

  // if Hasura operation errors, then throw error
  if (errors) {
    return res.status(400).json(errors[0])
  }

  let userData = data.users_by_pk;
  if (!userData){
    return notFoundError(res);
  }
  let passwordRight = await bcrypt.compareSync(userData.email.toLowerCase() + password, userData.password)

  if (!passwordRight) return notFoundError(res);

  const tokenContents = {
    sub: userData.id.toString(),
    name: userData.name,
    iat: Date.now() / 1000,
    iss: "http://localhost/",
    "https://hasura.io/jwt/claims": {
      "x-hasura-allowed-roles": ["user"],
      "x-hasura-user-id": userData.id.toString(),
      "x-hasura-default-role": "user",
      "x-hasura-role": "user"
    },
    exp: Math.floor(Date.now() / 1000) + (24 * 60 * 60),
  }

  const token = jwt.sign(tokenContents, "JWT_SECRET")

  // success
  console.log({
    id: userData.id,
    token
  })
  return res.json({
    id: userData.id,
    token
  })

});

function notFoundError(res){
  return res.status(401).json({
    message: "Email or password wrong",
    code: "401"
  });
}
The resulting code should look something like the above.
Which again can be tested by making a Graphql query in Hasura:
query MyQuery {
  signin(email: "test@email.com", password: "testPassword")
}
This should answer with the UserID of the above-created user as well as a JWT to sign the user in.
Handling secret keys and admin-secret
In this case, we didn't add any admin secret or changeable keys to the code. This is of course insecure and cannot be used in production in this state.
I again encourage you to take a look at the Github Project where I used Environment variables that can be set in ****the docker-compose file to ensure the server and the node (express) app always use the right *Secrets*.
Creating a Docker Project
Now that we have a working node server that handles the login as well as a working Hasura instance Its time to make it portable so it can, on one hand, be easy deployed to any production server, and on the other hand, be also easily clonable and used as a starting for any projects that needs a backend with a login.
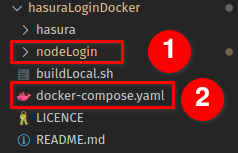
The first thing we will need to do is move the nodejs project folder to the same folder we hold the docker-compose.yaml. in.
The Project should look something like this:
With the nodeLogin being the node-server.
In the nodeLogin folder we will now create a file called dockerfile which will be used to automatically create and set up the node server in a docker environment.
In the dockerfile we have the following code
FROM ubuntu:18.04

LABEL maintainer="codingBits"
LABEL version="0.1"
LABEL description="Node Server to handle login and signup of Hasura"

ARG DEBIAN_FRONTEND=noninteractive

RUN apt-get update
RUN apt-get upgrade -y
RUN apt-get install nodejs -y
RUN apt-get install npm -y

EXPOSE 3000

COPY . /root/nodeLogin

WORKDIR /root/nodeLogin
RUN pwd
RUN rm -rf node_modules
RUN npm install

CMD ["/usr/bin/npm", "run", "start"]
A dockerfile is a file that is used to create a docker image, which then can be used to create a container and run it.
This file essentially
- creates a docker image based on ubuntu 18.04
- Installs nodejs and npm
- Exposes port 3000 to the outside
- copy the node server to the docker environment
- Installs the required node_modules packages
- Runs the start command once the image is loaded
After this is created we can now add this file to the docker-compose.yml to create this image alongside postgress and Hasura.
The file will look something like this:
version: '3.6'
services:
  postgres:
    image: postgres:12
    restart: always
    volumes:
    - db_data:/var/lib/postgresql/data
    environment:
      POSTGRES_PASSWORD: postgrespassword
  node-login:
    build: ./nodeLogin
    ports:
      - "3000:3000"
    environment:
      PORT: 3000
      HASURA_HOST: graphql-engine
      HASURA_SECRET: hasuraAdminSecret
      HASURA_PORT: 8080
      JWT_SECRET: "HASURA_GRAPHQL_JWT_SECRET_WITH_AT_LEAST_32_CHARS"
  graphql-engine:
    image: hasura/graphql-engine:v1.3.3
    ports:
    - "8080:8080"
    depends_on:
    - "postgres"
    - "node-login"
    restart: always
    environment:
      HASURA_GRAPHQL_DATABASE_URL: postgres://postgres:postgrespassword@postgres:5432/postgres
      ## enable the console served by server
      HASURA_GRAPHQL_ENABLE_CONSOLE: "true" # set to "false" to disable console
      ## enable debugging mode. It is recommended to disable this in production
      HASURA_GRAPHQL_DEV_MODE: "true"
      HASURA_GRAPHQL_ENABLED_LOG_TYPES: startup, http-log, webhook-log, websocket-log, query-log
      ## uncomment next line to set an admin secret
      HASURA_GRAPHQL_ADMIN_SECRET: hasuraAdminSecret
      HASURA_GRAPHQL_JWT_SECRET: '{"type":"HS256", "key": "HASURA_GRAPHQL_JWT_SECRET_WITH_AT_LEAST_32_CHARS"}'
      HASURA_GRAPHQL_UNAUTHORIZED_ROLE: 'public'
volumes:
  db_data:
This did some amount of changes to the environment variables of Hasura as well as add the node node-image under node-login.
Here we have to make sure we change variables like the JWTSECRET, the HASURAGRAPHQLADMINSECRET, postgresspassword so it cannot be guessed by users.
That information should be held confidential. And away from any user.
Once we are done developing we should also set HASURAGRAPHQLENABLECONSOLE and HASURAGRAPHQLDEVMODE to "false" since that increases the security by not exposing the admin access to any users.
Running the server
Once we are done we can run this by running
sudo docker-compose up --build -d
This will not immediately work out of the box, however, since we still have to adjust the Handler URLs for the actions.
Thanks to the docker-compose we can now access the node server by a name instead of an IP.
We have to switch the IP address and the port to node-login:3000.
The signUp URL would for example look like http://node-login:3000/SignUp.
Saving the state of Hasura
As I already mentioned before, Hasura does not directly save its state. When moving to another server or another machine all the state is lost.
This can be prevented by the help of the HasuraCLI which allows you to save all metadata like the actions and the structure of the database with migration files.
Those files can then be applied to a new running Hasura instance to make sure everything is in a working state.
To do this we will first need to install the HasuraCLI which can be done by following this tutorial or by calling the following code in Linux.
curl -L https://github.com/hasura/graphql-engine/raw/stable/cli/get.sh | bash
Afterward, we need to create a folder next to the nodeLogin folder called Hasura and copy the current state there. This can be done by following this guide for the database and this guide for the metadata, ****or running the following commands:
hasura init hasura --endpoint http://my-graphql.hasura.app
cd hasura
hasura migrate create --admin-secret 'hasuraAdminSecret'
hasura metadata export --admin-secret 'hasuraAdminSecret'
Afterward, those data can be added to a git folder and applied automatically on another machine by running:
hasura migrate apply --admin-secret 'hasuraAdminSecret'
hasura metadata apply --admin-secret 'hasuraAdminSecret'
In the Git Project this is immediately applied when building the docker via the buildLocal.sh script.
That's it!
That's it. This tutorial is skipping things like how to set up and use Environment variables in code since going too much in detail would be overkill for this already long post.
This is meant to give you enough information to take the git project, fork it, and create any project you want.
It is not meant as a complete, secure backend for a huge system since this also needs additional safety like preventing users to call this API too often in a row. This can however be achieved via tools like Nginx by adding a rate limit to the login or signup request.
This project could however act as a quick starting point to prototype your next project using Hasura and Graphql.
If you see any improvements don't hesitate to contact me via Git or the contact form of this blog. I'll do my best to address them.
Thanks for reading.