

TLDR
In this post, I will first talk about how to get started with Svelt and Sapper and offer the toolbox needed to create your first web app. I will also explain another advantage of using Sapper by comparing static pages and dynamic pages and showing how sapper can combine the advantages of both of them. If this all seems to lack examples to you, don't worry. In the next post, I will show some of the things explained here in detail by the example of a blog post page.
Getting started
Prerequisites
node & npm
If you are working under windows I would advise you to install git for windows and the git bash that comes with it. Most of the named commands can be run in either Powershell (or git bash) under Windows or the equivalent terminal in Linux or mac.
The next thing you need is nodejs installed (as most developers probably already will have if this isn't your first rodeo) if not you can download it here.
yarn
Currently, it is not advised by the svelte team to use yarn because yarn changes its way to handle require which creates a problem with the unconventional decision of sapper to use a node_modules folder in the src directory as well as the root directory.
Setting Up the Project
Now that everything necessary is set up correctly it's time to get started.
The first thing we need to do is create a project directory. This is done by first opening the terminal and going to the folder that we want our project to be in. In my case, I created my Project in /c/Projects. To go there in git bash we need to call
cd /c/Projects
from there you call
npx degit "sveltejs/sapper-template#rollup" my-app
with my-app being the name chosen for your website folder.
After this its time to install the necessary dependencies and start the initial dummy version of the project
cd my-app
npm
npm run dev
after this the terminal should state something like:
> Listening on http://localhost:3000
along with other data. This is the URL you have to enter in the browser to see how the website looks. While npm run dev is running we can open the folder we just created with an editor of our choice. I recommend using VS Code and edit the files. Doing changes on the files will immediately update the website displayed on the browser.
For example, we can open the file /src/routes/index.svelte and change the
<h1>Great success!</h1>
to
<h1> Hello Word </h1>
This updates the index page (=the first page showed when entering the URL) to display "Hello World".
In the next part, we will stay in this file to go into more detail how a svelte file looks like. Afterward, I will explain the general structure of the project to give a better understanding of what all the created files do.
Understanding File Structure:
The goal with Svelte as with the other Frameworks is to encourage the use of Components. In general, a Svelte file has 3 Important Parts:
- The script tag
- The Style tag
- The HTML
<script>
    import successkid from 'images/successkid.jpg';
</script>

<style>
    h1, figure, p {
        text-align: center;
        margin: 0 auto;
    }

    h1 {
        font-size: 2.8em;
        text-transform: uppercase;
        font-weight: 700;
        margin: 0 0 0.5em 0;
    }

    figure {
        margin: 0 0 1em 0;
    }

    img {
        width: 100%;
        max-width: 400px;
        margin: 0 0 1em 0;
    }

    p {
        margin: 1em auto;
    }

    @media (min-width: 480px) {
        h1 {
            font-size: 4em;
        }
    }
</style>

<svelte:head>
    <title>Sapper project template</title>
</svelte:head>

<h1>Great success!</h1>

<figure>
    <img alt="Success Kid" src="{successkid}">
    <figcaption>Have fun with Sapper!</figcaption>
</figure>

<p><strong>Try editing this file (src/routes/index.svelte) to test live reloading.</strong></p>
The script tag is run the second the Component is created to enable dynamic behavior. This however does not mean that the javascript that is run there is run in the context of a web browser. It is run by the compiler to compile the svelte file into an HTML equivalent. It is not guaranteed that typical browser variables like windows are there at compile time. The use of variables like window is generally possible when using lifecycle hooks like onMount but should be avoided as there are generally better alternatives that produce better code structures.
The style tag is mostly like the style tag an HTML file would use. The style used here however only applies to the HTML in this component. The same class in another component would not be changed by it. This enables to be less cautious about class names and to only focus on one component at a time without worrying what side effects this might have on the other Components.
Last but not least the HTML part of the file can, in general, be seen as simple HTML. It is however also possible to access variables from the script file directly in there. In the example above, the script tag imports a file called success kid which is directly referenced in the src attribute of the tag further down in the code.
To understand Svelte more and all the different nuances I advise you to look into the interactive tutorial offered by the creators of Svelte.
Understanding the project structure
Now that we talked about the most important file type we should take a general look into the project folder to understand what our blog will be made of.
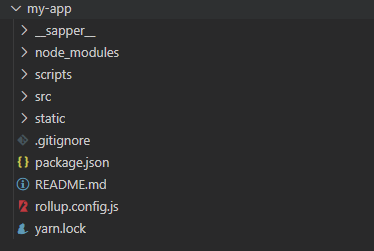
In here you can for once see the sapper folder. This folder can be ignored for now it mostly just contains the generated files after the browser is done compiling.
The node_modules folder is as most of you will probably know also automatically generated by npm. It contains all the dependencies of the website. There exists another node_modules folder in the src folder which is used by sapper to allow easier importing of the lifecycle method and other components.
The scripts folder exists to offer useful scripts. Here could be a deploy script to your server or in the case of sapper a script to enable typescript. For this tutorial, we will keep our project to plain javascript, so this folder can also be ignored.
The next folder is the most important folder for us. The src folder.
src
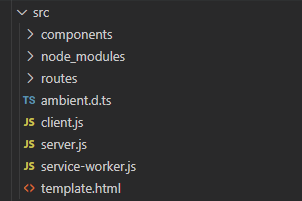
This is the folder where our code will mostly be written.
Here we have the components folder which holds all the components that we use to build our web app. The first component that is initialized is the header bar. The header bar is the same on many pages as it enables navigation through the website. So it makes sense to create a component from it.
The next folder that is important is the routes folder. This folder describes what should be opened of the path localhost:3000/ , the path localhost:3000/about or the path localhost:3000/blog.
The first part is the URL which just tells the browser where to request the files. The part with the / tells the browser the path of the files requested.
The routing is done in the following order:
- Look for the index.js in the given path.
- If it does not exist look if the last part of the path has a file that responds to the name. ex.: about.json
- If neither exists look for a [slug].svelte
- If not open the _error.svelte
Aside from this routing, you can see a _layout.svelte file in the route directory. This file functions as the container of the above-loaded files.
It has a <slot></slot> tag which describes where the above requested svelte component should be put.
This is for example used to always render the Navigation bar on every website without setting it in every component.
The rest of the files in the src folder can be ignored for now. They are used by sapper to enable start the frontend client and server as well as describe where the code in the HTML should be placed.
static
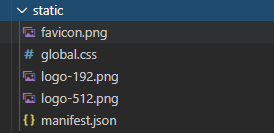
The last folder is the static folder. It holds static files that need to be accessed by the HTML. Those will be placed at the root of the website.
For example http://localhost:3000/favicon.png loads the favicon.png.
This can be used to set up static assets that won't dynamically change in the future.
There is also a global.css file that enables to use CSS globally.
Rest
The rest of the files are useful too but going into too much detail would make this post even longer than it is already going to be. I encourage you to take a look at the sapper documentation to read more about the file structure.
Static vs Dynamic pages
The tools above should be enough to enable you to start writing your own web app using svelte and sapper. At least the basics. In the next post, I'll talk a little more about examples of displaying data. For now, there is another thing I'll have to talk about to round up the advantages of using Sapper.
For this, we have to understand the difference between a Static and a Dynamic Website.
Static Website
A Static website is a website that does not do any calculations on the server-side. It simply hosts the files that are going to be shipped to the user. Afterward, the site usually runs javascript code in the browser to enable fetch dynamic content.
Let's say the user wants to see the route localhost:3000/blog?post=post123. But the post has to be fetched from another server.
This means the user first asks the Server for an HTML file which is then interpreted by the server to load the information of the Post from another server (given that the post is not hardcoded). Hardcoding Dynamic content like a post is usually not a good idea since we might want to enable editors that are not experienced in HTML to write posts.
This approach has several advantages but also disadvantages
Advantages
- The server only needs to send precomputed HTML which means that the server needs way less logic and computation power.
- There is a lot of cheap and easy hosting options for static websites
- Improved security against attacks on the site hoster (if the content server is not vulnerable)
Disadvantages
- Overall slower "contentful paint" because there needs to be an extra request to another server to get the dynamic data to display.
- The client has to have access to the database or another server delivering the content which makes this possibly be attacked
- Without a database or a server serving the content has to be added by the programmer of the website. (Need of technical knowledge.
Dynamic Website
A dynamic website is a website where the server is not just serving files but also runs logic before the content is served. This can be fetching content from a database, making sure the user is allowed to access the data via authentification header, or prerendering and optimizing data before the user even sees the page for the first time. This has advantages or disadvantages as well.
Advantages
- Logic is done serverside which can make caching of similar requests easier (if they don't change too quickly)
- Content can be saved on a per-user basis without the user having access to a database.
- Faster load times
Disadvantages
- Harder load on the server because every non-cached request has to make calculations.
- Static hoster are usually more expensive
Fetching Data on the Server
This project was initially thought out to be used by a non-techy person (you can read the reasons behind it in the first post).
Creating a page that needed to be updated by the developer if new content was to be added was out of the question. This either meant that I could create a static page that lets the user load content from a server every time or a dynamic page that loads the data on the backend site which made caching easier.
In both cases, this needed a backend or serverless architecture to offer the website which means higher costs overall.
Or not…
Here the strength of Svelte and Sapper comes into play.
Sapper not only allows to easily offer a dynamic website that prerenders the website and when done right only requests data from the server when they change.
It goes a step further and can return a static page based on the contents fetched from a server.
This means you can offer a small lightweight Linux server for the client that listens to changes on the backend and then on changes rerenders the website to a static site to post it directly to a static hoster.
If the user is just a little tech-savvy you could even enable him to run this script on his home computer. This means the user has to:
- Run the CMS Admin panel locally
- Do the changes in the CMS
- Wait for the CMS to rerender the static page and redeploy it directly to the static hoster.
This easily takes away the need for an expensive Linux server, while keeping all the advantages of a CMS.
For a blog, this way should be completely sufficient.
What's next?
Next up I'll take an example blog post File in sapper to explain the above-learned features in more detail. I'll explain how to use Sapper to fetch the content of a blog page on the server-side and how to generate a dynamic website and render it as a static website that can be deployed to a static hosting provider.